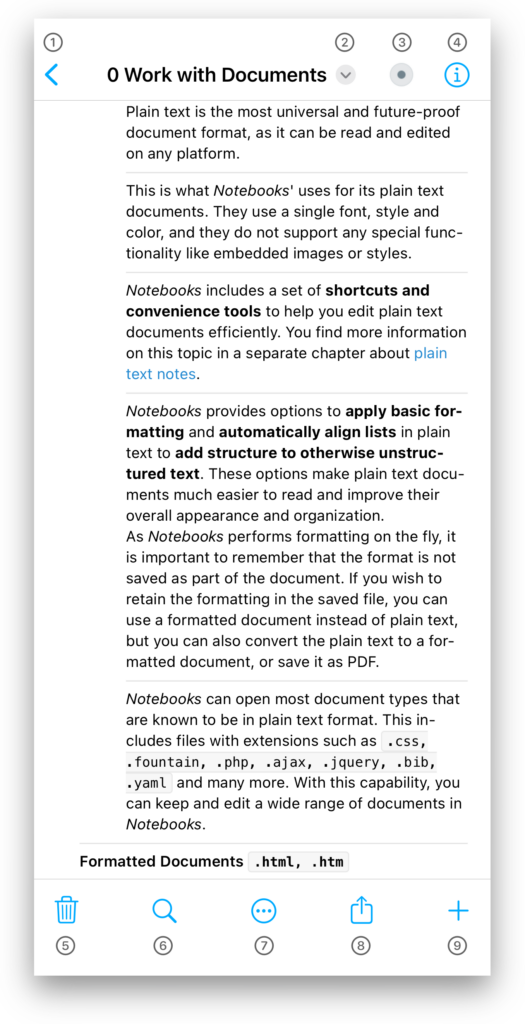
The Document View on iPhone & iPad
The document window on your iPhone or iPad displays a row of buttons along the top, and another one along the bottom of the document. These rows are called Navigation Bar and Toolbar (or sometimes just header and footer). By default, both of them are visible, but on an iPad, Notebooks provides a setting to move the content of the toolbar to the header, leaving more space for the document. Moreover, you can switch to Fullscreen Mode (see Gestures), which hides both, header and footer, and provides a distraction free mode for writing.
The Navigation Bar
The row of buttons along the top edge of the document is called Navigation Bar.
- ① < Back Button
- This is the leftmost button on an iPhone, and it takes you back to the containing book.
- Fullscreen
- On an iPad, where the document has its own window, the leftmost button is the Fullscreen button, which fades out the left column with the document list, and leaves maximum screen space to the document.
To return to normal view, tap the document once with two fingers. - ② Document Title
- The document’s title appears in the center of the navigation bar. On iOS 16 and later, the title has a menu attached. For details, see below.
- ③ Task State
- If the current document is a task, an icon representing its state appears next to the title.
- Tap the icon to change the task state.
- Tap and hold the icon to set or clear its due date.
- ④ Info
- Tap the info button to display and display the document’s properties and modify its attributes.

The Title Menu
On devices running iOS 16 or later, you can tap the document’s title to display a menu with the following options:
- Go to…
- Displays a hierarchic list of all books, and—optionally—the list of recent items. So this is ideal if you want to return to a previously opened document, as in a history list, or jump to any book without explicitly navigating the hierarchy.
- Favorite or Pin to Top
- Set or unset the document as Favorite or pin it to the top of the document list.
- Rename
- A convenient way to change the document’s title without opening its Info. You can also change the document’s file type by adding a specific filename extension to the title.
- Move
- Presents a collapsible list of all available books and allows you to move the current document to different location.
- Show as Document
- If the current document is contained in a task list, this option allows you define whether the document should appear as task or as regular document.
- Set Due Date
- If the current document is a task, you can use option to set or clear its due date.
- Copy…
- This is a submenu with options to copy the document in various formats, like the document itself, its link, its content as plain text, Markdown or formatted, etc.
The Toolbar
The toolbar is the row of buttons along the bottom edge of the document window. On an iPad, Notebooks give you the option to move the buttons to the navigation bar, which leaves more space for your document.
- ⑤ Delete
- Move the document to the Trash, or—if you disabled trash in Notebooks‘ settings—permanently delete it.
- ⑥ Magnifying Glass
- Find and replace in the current document. The button is grayed out for document types which do not support find.
- ⑦ Process
- A menu with actions and options to process the document, creating duplicates or other representation of it.
- ⑧ Share
- A menu with options to export, copy or share the document.
- ⑨ New
- Create a new document.
