Task Management
With so many task management apps available for iPhone, iPad, and Mac, you may ask why Notebooks bothers to include its own tools. The answer is simple: there is a seamless transition from taking notes to managing tasks, one naturally follows the other. So it is obvious that Notebooks integrates task management to improve your workflow and productivity.
There are a few other compelling reasons as well.
- Centralizing projects, associated notes, and reference documents in one unified space contributes to maintaining a seamless flow of thoughts when generating ideas and breaking them down into tasks. There is no need to switch between applications, which would disrupt this flow.
- Describing a project’s goal or the reasoning behind a decision often demands more than just a few words. In Notebooks, ideas can be expressed and expanded upon without limitations on verbosity, whereas many other task management tools confine you to a single note field. Writing is a fundamental strength of Notebooks, and transforming ideas into tasks or projects is a patter of just a few taps.
- As a project develops, a single task may transform into a small project of its own, turning the original project into a hierarchy of smaller projects. Notebooks can visualize these hierarchies, as opposed to merely listing tasks sequentially, so you maintain control over the project and focus in on the details when necessary.
- A Reference Library holds background material and supportive documents which help decision-making and task completion. It is a vital component of task management, closely related to your task lists. In Notebooks, these elements are tightly integrated and always accessible with just a few taps. Over time, a completed project may even become part of the reference library.
- Context Tags introduce an additional level of structure, allowing you to quickly pull together books, tasks or documents from various part of your Notebooks structure.
An Introduction to Notebooks’ Task Management
This section aims to provide you with a more in-depth introduction to Notebooks‘ approach to task management, before we delve into the specifics of creating tasks and task lists. Feel free to skip it or return to it later.
If you have been using dedicated task management apps, you may find Notebooks’ simplicity and flexibility refreshingly surprising.
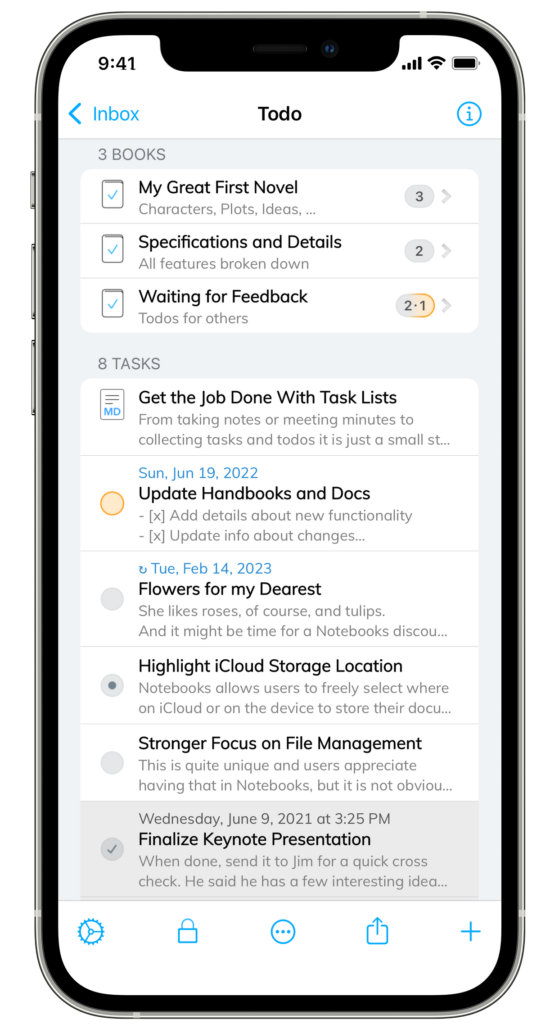
- You can turn any regular book into a task list, and all items in that book will appear as tasks: short notes, multi page documents, photos, PDF documents, everything.
- Task lists use a dedicated icon to differentiate from regular books, and they show the number of open and due tasks next to their titles.
- The items in the list display a clickable task state icon instead of their document icon; click the icon to cycle through the task’s state between Open > Started > Done > Canceled. On an iPhone or iPad, tap and hold the icon to bring up a calendar to set due date and alert time, on a Mac, right-click the task to set the same (there are a few other options for setting these details, too).
- You can revert a task list back to a regular book anytime. In this process, Notebooks preserves the state of all tasks. If you later transform the book back into a list, the tasks will retain their respective states.
- You can choose to have specific items still appear as regular documents in the task list, so you can have a mixture of tasks and documents. The documents appear at the top of the list and can serve as reference or introduction to the list.
- Notebooks does not enforce any attributes for your tasks, but you can assign due dates and alert times if you want. There are only a few options, as we strive to keep task management light weight; your energy should go into completing tasks, not into managing them.
- Notebooks provides options to automatically populate task lists for, if you choose.
- Regular books and task lists can coexist anywhere within Notebooks, and you can nest lists in books and books in lists.
This flexibility might make you miss the strict separation between Today, Next, Scheduled etc., but Notebooks covers most of that, in a slightly different way: when there is at least one due task, or if you set Notebooks to look ahead for due tasks, you find the smart book Due Tasks at Notebooks’ top level, which acts as your dashboard:
- At the top level of the Due Tasks book you find your due and overdue tasks. This is very much like the Today section in other apps. In Notebooks, you don’t explicitly assign a task to the today section, tasks show up automatically when they reach their set due date.
- You can set Notebooks to look a couple of days ahead and also show tasks that are about to become due. In a way this is like a Scheduled section, because you see tasks with a due date within the next up to seven days.
- Tasks without a due date are obviously set to be done someday, but we don’t think they need an extra section.
- On an iPad or iPhone, the dashboard also provides a Calendar view highlighting the days on which tasks become due. Select a date from the calendar to view the tasks that need to be done on that day. – This also resembles the Scheduled section you may know from other apps.
- There is a dedicates smart book All Task Lists which provides quick access to any task lists, no matter where within Notebooks it is stored. Each list shows a badge indicating the number of open and due tasks, you can open the list, view and work on the tasks, change their states etc. This is a convenient shortcut if you want to focus in on your tasks.
- What you may miss is a dedicated Up Next section to list the upcoming tasks for various projects. We deliberately skipped it, because we feel that it is more efficient to concentrate on a specific project and decide what to do next, instead of looking at a set of more or less unrelated tasks. But maybe this is just the way we work.
- To complement the dashboard view, you can utilize Notebooks’ Context Tags. So if you want a specific group Someday, for example, you create a context and assign that to selected tasks.
Task Lists and Checklists for Different Purposes
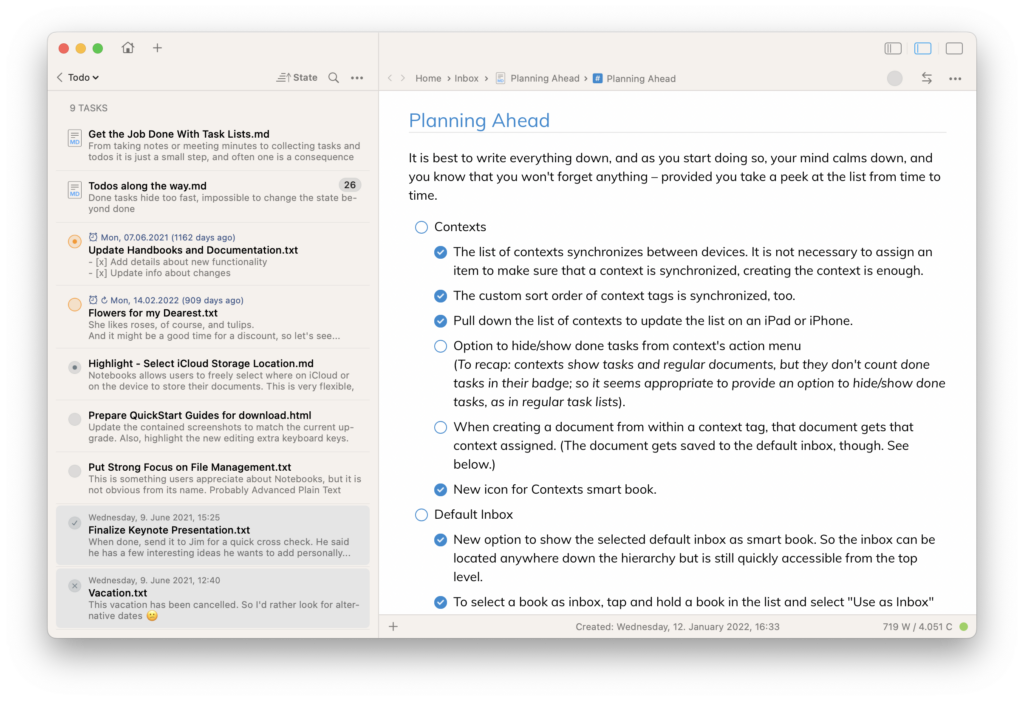
When talking about task management in Notebooks, we usually refer to task lists as seen in the left section of the screenshot below. Task lists are books that displays their content as checkable tasks, with options to assign due dates and task states. All advanced task management functionality is based on these task lists.
Notebooks also supports simpler checklists, as shown in the right pane of the screenshot. Checklists are embedded in editable documents, each item in the list displays a clickable checkbox and consists of a single line of text. This is what you would typically use for a quick collection of ideas, a shopping list, pack list, or any other list where a brief description is sufficient for each item. Checklists don’t have any advanced functionality.
So depending on your needs or the project at hand, you can use Notebooks‘ task lists, or you just add one or more checklists to your editable documents.
The next chapters will go over each type in more detail.
Checklists
Checklists are a simple tool to help you stay organized. They allow you to break down tasks into manageable steps, each marked by a clickable icon that you can tick off as you go. With nested checklists, you can create sub-tasks within larger tasks, giving you a clear visual hierarchy of what needs to be done.
- Checklists are prefect for shopping lists, pack lists, or for quickly collecting ideas.
- They act like bulleted or numbered lists, but display a clickable icon instead of a leading bullet or number.
- Click or tap the icon to toggle its state.
- Indent and outdent lists to create nested checklists.
- Keep as many checklists in a single document as you need.
- Items on a checklist cannot have a due date and don’t appear in Notebooks‘ smart book.
Checklists in Formatted Documents
- To create a checklist in a formatted document, select its list type in the formatting bar. On a Mac, or when using an external keyboard, you can use the keyboard shortcut
⌘Lmultiple times to turn the current selection into a checklist. - When you tick off an item, Notebooks changes the state of the icon and saves the document. So ticking off tasks modifies the document.
Checklists in Markdown
- In a Markdown checklist, each item needs to start with
- [ ], or- [x]for completed items. - Like regular lists, they can be indented with Tabs or four spaces.
- When you click an item in the document’s formatted view, Notebooks looks for the corresponding task in the plain Markdown text, toggles the leading task marker (
- [ ]or- [x]) and saves the document.
In case Notebooks is unable to identify the task in the plain Markdown text, you will see a notification. This may happen when the conversion from HTML to Markdown is ambiguous.
Here is an example of a checklist in Markdown:
- [ ] Create list in html and Markdown
- [ ] Documents may contain more than one such "ad hoc tasklist"
- [ ] Allow Notebooks to extract these tasks and add them to inbox
Checklists in Plain Text
While Notebooks does not display any clickable items in plain text, you can still use the Markdown notation to create checklists. You could then switch the document to its formatted view (with ⌘⏎ on a Mac, for example) and tick off the tasks in this mode.
Extract Tasks from Markdown Checklists
Notebooks provides tools to automatically detect and extract tasks in editable documents and make them available in your Default Inbox, which could be set as a task list. The details follow later in this chapter, but here is a convenient option: when you set - [ ] as task marker, Notebooks‘ can extract your todos from Markdown checklists and add them to your inbox. As you tick off these items in your inbox, Notebooks marks them as completed in the original document, too.
A benefit is that you don’t need to search all your documents and checklists for open todos, as you find them all in your inbox.
Find Documents containing Open Markdown Todos
With checklists embedded in documents and scattered across Notebooks, it is easy to lose track of open todos. Fortunately, Notebooks‘ full-text search is here to help you.
- Enter
"- [ ]"in Notebooks‘ search field and allow it to search within your document content to generate a list of all documents that contain open Markdown tasks. - You can take this a step further by using a URL scheme: simply add the following link to a document, and clicking on it will trigger a search for documents with open Markdown tasks:
notebooks://search/%22-%20[%20]%22
Task Lists
In our terminology, a Task List is a book that displays its contained documents as tasks, each with a clickable icon. These tasks can have states such as open, started or done, along with options to set due dates, alert times, and repeat intervals. When compared to Checklists, Task Lists provide more control, but also demand a little more attention to detail.
- Task lists are books which display their contained documents as tasks.
- Task lists can be nested, just like regular books, and they show the (cumulated) number of uncompleted tasks.
- Tasks are regular documents, ranging from a brief plain text note to a multi page PDF document, a Keynote presentation or anything else.
- In the task list, each task displays a clickable icon instead of its document icon. Click or tap the icon to change its state; right-click the task or tap-and-hold the icon to set the task’s due date.
- When sorting tasks by task state, Notebooks lists due items first, open or started tasks with a due date in the future next, followed by tasks without due date. Done and cancelled tasks appear last in the list.
- You can set selected items to display as regular documents instead of tasks. These documents are sorted at the top of the list and don’t count as tasks, making them ideal for introductory or reference materials.
How Task Lists Work
- Task lists use a specific icon instead of the book icon, and they display a badge with the number of open and due tasks.
- As task lists are books, you can have nested lists, which is convenient for breaking projects down into smaller, more manageable sub-projects. At each level, the list’s badge summarizes the number of open tasks of all sub-projects.
- You can put any type of document into a list: text notes, formatted or Markdown documents, PDF documents, images, everything.
- In a task list, the contained items display an icon representing their current state:
- Open
- Open, due
- Started
- Started, due
- Done
- Cancelled
- Tap or click an item to change the task’s state.
- Tasks can have due dates and alarm times assigned. When a task reaches its due date, its icon turns orange and the task list’s badge indicates the presence of due actions. Notebooks’ app icon also updates the number of due items.
- To set or change a task’s due date or repeat interval, you can
- open the task’s info and change the task details,
- on an iPhone or iPad, tap and hold the task icon to activate the time- and date picker,
- on a Mac, right-click the task in the list and select Due Date, or click and hold the task icon in the headerof the document view.
- A task list displays the due date above the task’s title. When a task is done or cancelled, its completion date appears instead of the due date.
- All due tasks appears in the smart book Due Tasks.
- For quick access to all task lists throughout Notebooks, you can set Notebooks to display the smart book All Task Lists.
Create Task Lists
In Notebooks, a simple attribute determines whether a book displays its content as a list of regular documents or as a list of clickable tasks. This means you can create new task lists, but you can also convert existing books into task lists at any time with just a simple switch—without losing any of your information.
Notebooks provides several options to create task lists or turn existing books into task lists:.
On iPhone & iPad
- When creating a new book, simply turn on the Show as Task List switch in the dialog, and the new book will immediately function as a task list.
- To convert an existing book,
- open the title menu (the menu you reach by tapping the current book’s title) and choose Show as Task List, or
- open the book’s info and turn on the switch Show as Task List.
- Another way to create a task list is to open a document and select Convert to Task List or Extract Tasks from the action menu. Both actions will create a task list and populate it with the document’s contents. More details on these actions are provided below) .
On Mac
- The File Menu as well as all + menus include and additional option New Tasklist which, which allows you to create a new book and turn it into a task list in one step.
- You can turn an existing book into a task list in multiple ways:
- From the outline, by right-clicking a book and choosing Show as Tasklist.
- From the document list,
- by clicking the ••• button in the header and choosing Show as Tasklist, or
- with books visible in this list, by right-clicking the title of a book and choosing Show as Tasklist.
- From a book’s info by checking the box Tasklist.
When you turn a book into a task list, Notebooks adds a hidden system file NBTaskDetails.plist to that book, which contains all the task’ details including their states, due dates and repeat intervals.
Revert Task Lists to Regular Books
You can transform a list back into a regular book at any time. Simply toggle off the option Show as Task List, using any of the switches and options described above. As you do so, your tasks will display as regular document again, the task list’s icon changes to a book, and the badge with the number of open or due tasks disappears. Moreover, the smart books Due Tasks and All Task Lists will update and exclude any items contained in this book.
When you transform a task list into a book, Notebooks renames the system file NBTaskDetails.plist to NBTaskDetails_inactive.plist to preserve the current states and settings of your tasks. If you turn this book into a task list again, Notebooks reactivates these details, so you find the list exactly as you left it. – Reverting a task list to a book does not reset your tasks’ states. Notebooks provides a dedicated action for that.
Add Tasks to Task Lists
The most obvious way of creating a new task is to add a document to a task list. This can be a short plain text note consisting of a single line of text, an extensive PDF document, meeting minutes, a sketch, a photo, in fact any document that Notebooks can handle.
A task list is just a book that presents its contents in a slightly different manner, so it is the book that makes the difference, not the document.
Turn a Document into a Task List
When you start writing, you often don’t anticipate that your thoughts may evolve into actionable tasks. However, as your ideas take shape, you may find yourself naturally gathering tasks that need attention. – Just think of meeting minutes, a brainstorming session or a quiet moment when you write down your thoughts and ideas, where you may end up with a list of todos, all in one single document. Notebooks offers convenient tools for separating them into tasks in a todo list:
- From the document’s action menu, select Convert to Task List…
- You are provided with options how to split the contents of the document into separate tasks: either by line, by paragraph, or don’t split it at all and put the whole document into a new task list.
(There is a special option Extract at… that looks for specific markers in your text, but that is described in more detail below. )
This is what happens:
- Notebooks creates a new task list (book) and gives it the title of your document; if a book or task list with that name already exists, Notebooks uses that instead of creating a new one.
- Depending on your selection, Notebooks splits the document by paragraph or line and adds the segments as tasks to the list.
If the document you want to split is already stored in a task list, the action menu shows an additional action Extract Tasks… which basically works as above, but instead of creating a new list it adds the tasks to the current list.
Extract Tasks From an Existing Document
Sometimes, splitting the whole document by line or paragraph may not provide enough flexibility. Let us look at an example again: meeting minutes may contain the list of participants, topics covered, decisions made, and — scattered across these sections — a couple of todos, which you now want to extract. In this case, the above actions won’t do what you need, because they take the whole text and split it by line or paragraph. However, Notebooks offers a more advanced action that allows you to extract only specifically marked tasks.
First, you’ll need to define a task marker—a specific character or sequence of characters placed at the beginning of a lineto indicate that the following text is a task.
- Open Notebooks‘ settings and navigate to Tasks > Prefix to mark a line as Task.
- Type the character, phrase or sequence of characters you want to use. Examples are “!!”, “#”, “-“, “TASK”, but you are free to set whatever you like.
A specific case is- [ ], which denotes todos in Markdown text. Using that as task marker allows you to conveniently extract Markdown todos as Notebooks tasks.
In our example we will use the marker “!!”, so lines starting with “!!” indicate a tasks.
With the marker set, the actions Convert to Task List and Extract Tasks provide an additional option Extract at !!—provided the marker appears in the document. Choosing this option will extract only the lines marked as tasks. You can use this action multiple times and Notebooks will do its best not to create duplicate tasks.
If the document is stored in a task list, new tasks are extracted to that list. If the document resides in a regular book, Notebooks creates a new nested task list with the name of the document; if a list or book with that name already exists, Notebooks uses that.
Updating Extracted Tasks
For each extracted task, Notebooks keeps track of the original document. When you then mark a task as done or cancelled, Notebooks updates the original document to make sure it reflects the task’s new state. So in the meeting minutes from the above example, you immediately see which tasks have been completed, even though you checked them in the task list.
Extract Tasks after Editing
On iPhone & iPad
Notebooks provides an option to automatically extract marked tasks as soon you dismiss the keyboard. You activate this option by toggling the corresponding switch in Notebooks‘ Settings > Tasks, where you can also set Notebooks to save extracted tasks to your default inbox instead of a task list associated with the document.
On Mac
On your Mac, Notebooks does not extract tasks automatically, because there is no clear hint of when you are done editing. So instead of extracting the tasks automatically, you can use the keyboard shortcut ⇧⌘X to extract tasks from the current document.
Default Inbox
In the realm of tasks and task lists, having an Inbox is a common practice. This is a dedicated list where you can keep unsorted todos, temporary items, or tasks that need to be organized and dispatched to other lists later. An inbox serves as a convenient place to store things you plan to address in the future.
Notebooks does not require you to use an inbox, but it does give you the option to designate any of your existing books as Default Inbox. This way, you can choose where extracted tasks, unsorted tasks and temporary items will automatically be stored. You have multiple options to set a Default Inbox.
On iPhone & iPad
- In Notebooks‘ settings, navigate to Tasks > Default Inbox and select the book or list that you want to use as your inbox.
- Tap and hold the title of a book and choose Use as Inbox from the context menu.
- To select the current book as your inbox, tap the books’ title in the navigation bar and choose Use as Inbox.
On Mac
- In Notebooks‘ settings, navigate to Tasks > Default Inbox and select the book or list that you want to use as your inbox.
- Right click a book in the outline and choose Use as Inbox from the context menu.
- To select the current book, click the ••• button in the header of the document list and choose Use as Inboxfrom the menu.
Send Selected Text to your Default Inbox (iPhone and iPad)
With a default inbox set (let’s assume its title is Inbox), you can highlight text in any editable document within Notebooksand select Add to Inbox from the popup menu. Notebooks takes the highlighted text and creates a new document in your default inbox.
This is a convenient way of collecting todos as you stumble over them, or as they come to your mind: you might be working on a project when you remember you need to buy some peanut butter. Without leaving your current document, simply type “Buy peanut butter”, highlight the three words, select “Add to Inbox” and you are done. Delete the text and continue with your project.
Due Dates, Alert Times and Repeat Intervals
If you need to complete a task at a specific date or if you want to start it on a certain day, you can assign it a Due Date. To receive a notification when a task becomes due, you can assign it an Alert Time, and for recurring tasks you can specify Repeat Intervals.
Due Dates
You can assign a due date in multiple ways:
- Open the task’s info, tap Due Date and select the due date from the calendar.
- On an iPhone or iPad, tap and hold a task’s icon until the date selector pops up. You can do that from the task list or in a task’s toolbar (top right).
- On your Mac, right click the task in the list and choose Due Date from the context menu. Alternatively, click and hold the task icon in the header of the document, or use the keyboard shortcut
⌥⇧⌘D.
Once the due date is reached, a few things change:
- The due task displays a highlighted icon to mark it as due, and the badge for the task list adjusts its count.
- The task appears in the smart book Due Tasks. On your iPhone or iPad it also appears in Notebooks‘ widget, and if you use an Apple Watch, it appears in Notebooks‘ Due Tasks on your watch as well.
- The badge on Notebooks‘ icon (on the Home screen or in the Dock) adjusts its count.
Alert Times
To receive a reminder or notification when a task becomes due, you can assign it an alert time. At the designated alert time, Notebooks will play a sound and display a banner, based on your settings in Notification Center. Moreover, the task will become due at that specified time instead of early in the morning.
- You set the alert time in the same dialog where you set a task’s due date.
Recurring Tasks
For recurring tasks you can set a repeat interval. After the set interval Notebooks will remind you of the task again.
- You set repeat intervals in the same dialog where you set a task’s due date and alert time.
There are two types of repeat interval:
- Use Repeat Every for tasks that recur at fixed intervals, regardless of whether the task was previously completed. This can be a medication reminder, a weekly meeting, an annual checkup or anything like that.
- Use Repeat when Done for tasks that should recur after the previous instance has been completed. An example could be a reminder to back up your files or schedule a dentist appointment, where the next reminder will be set as soon as you mark the current instance as completed.
When you mark a repeating task as done, Notebooks assigns it the new due date, but it also creates a duplicate of the task, adds the current time stamp to the duplicate’s title and marks it as done. This way, Notebooks creates a log of completed tasks for later reference.
Mix Tasks and Regular Documents
Sometimes it can be useful to keep certain items in a task list as regular documents rather than as tasks. These documents might serve as a project overview, detailed documentation, or a space to jot down ideas without immediately converting them into tasks. By leveraging Notebooks’ ability to automatically extract tasks from written text, these documents could serve as the base for quickly generating new tasks that are relevant to the current project. This approach allows you to maintain a clear distinction between actionable items and supporting information, all within the same task list.
To display a task as regular document, use any of these options:
- Open the task’s info and turn off the switch Show as Task.
- Tap and hold or right-click a task in the list and turn off the option Show as Tasks.
- In a task’s action menu, turn off the option Show as Task.
Notebooks now treats this item as a regular document: there is no task icon, not due date, the item does not count as open or due task. The setting of this switch has no influence on the document itself, because tasks are always stored as regular documents.
While you can display items as documents in a task lists, you cannot display items as task in regular books.
Hide Done Tasks
When sorting a task list by task state, Notebooks moves done and cancelled tasks to the bottom of the list to help you maintain a clear view of what still needs to be done.
When sorting the list by title or date, however, open and done tasks appear mixed up, which may make it difficult to see what is next. To enhance clarity and productivity, Notebooks provides an option to hide done tasks from the list.
- In Notebooks‘ Settings > Tasks, toggle the switch Hide done tasks.
- On your iPhone or iPad, open the title menu (the menu you reach by tapping the current book’s title) and choose Hide Done Tasks.
- On your Mac, click the ••• button in a task list’s header and choose Hide Done Tasks
With done tasks hidden, Notebooks skips them from the list to reduce visual clutter, but you see the number of done tasks at the top of the list.
Reset All Tasks
Some of your task lists may contain one-off projects, but others may consist of recurring tasks that you want to reset regularly. For the latter, an option to reset all tasks at once can be incredibly convenient, as it allows you to quickly clear the list and prepare it for the next cycle. Let’s look at a few examples:
- Recurring Projects: If you manage projects that repeat periodically (e.g., weekly reports, event planning, or routine maintenance tasks), being able to reset all tasks allows you to quickly prepare for the next cycle without having to manually recreate each task.
- Quick Re-evaluation: Sometimes, after completing a set of tasks, you might want to revisit them to ensure everything was done correctly or to review them in a different context. Resetting tasks lets you go through them again as if they were new, offering a fresh perspective.
- Training or Practice: If you use task lists for training purposes or for practicing a routine, resetting all tasks lets you start from scratch each time, which is particularly useful for learning or rehearsal.
- Resetting After an Interruption: If you’re interrupted during a task cycle or need to restart a project due to changes in priorities, resetting the tasks can help you start fresh without the clutter of previously completed tasks.
To reset all tasks in a task list, use one of the following options:
On iPhone & iPad
- In the footer of a task list, tap the ••• button and choose Reset Tasks…
On Mac
- In the outline, right-click a task list and choose Reset Tasks….
- In the header of a task list (second column), click the ••• button and choose Reset Tasks… from the menu.
Please note: Reverting a task list back into a book preserves all task states and details, as mentioned earlier. So this is not suitable for resetting all tasks.
Smart Book Due Tasks
When Notebooks detects at least one due task, it displays the book Due Tasks in the smart book section at the top level. This smart book provides quick access your due items, independent of where they are stored.
- The lists of all due and overdue tasks is sorted with most overdue items at the top by default, but you can change the sort order to your liking.
- If you set Notebooks to look ahead for tasks, items that will become due within the next couple of days are included in this list. You can set and adjust the look ahead time frame in Notebooks’ settings (iPhone and iPad) or from the smart book’s context menu.
- On your iPhone and iPad, the smart book includes access to a calendar with a timeline view of tasks with due dates. Days with assigned tasks display a small marker, and selecting one of the marked dates will show the list of tasks scheduled for that day.
You can permanently enable the smart book Due Tasks even when no items are due. All you need to do is tell Notebooks to look ahead for due tasks: in settings, navigate to Tasks > Look ahead for Due Tasks.
Smart Book All Task Lists
As you can spread your task lists across Notebooks’ hierarchy, it may become difficult to stay on top of your todos. Due tasks will always show up in the corresponding smart book, but others won’t. To address this, Notebooks has an option to add All Task Lists to its smart book section. This smart book lists all your task lists and provides a consolidated view on your projects in one spot. This helps you centralize your task management and improves focus on the most important tasks.
Task Lists and Protection (iPhone and iPad)
As always, when Notebooks is locked, it provides no visible indication of protected items. You do not see protected tasks, and the task lists’ badges will not count protected tasks, either. There is one exception, though: when a protected task becomes due, Notebooks’ icon on the Home screen will indicate that, but to see it on the list you need to unlock Notebooks.
Widget – Due Tasks (iPhone and iPad)
One of Notebooks widgets displays your due tasks in notification center or on your home screen. The widget comes in three sizes, where the smallest just displays the number of due tasks, the other ones display a list of due tasks. Tapping a task opens it in Notebooks, where you can modify its content or change its status.
In the case of protected due tasks, Notebooks still shows the total number of due tasks, but the list won’t include the protected ones.
Archive Done Tasks and Lists (iPhone and iPad)
When you’ve completed all or some of the tasks in a list and want to keep the tasks as a log before deleting them, Notebooks offers a few options to create a compact, space-saving archive. This allows you to retain a record of your completed tasks without cluttering your active task list. Here are the options:
- To archive completed tasks, simply open the task list’s action menu and select Archive Done Tasks…. Notebookswill combine completed tasks into a single document, and then delete them from your active list. If you ever need to restore these tasks, Notebooks allows you to split the document back into individual tasks.
The first time you archive tasks, Notebooks will create a document titled Done Tasks and mark it internally as an archive. You can rename this document to anything you like, and Notebooks will still recognize it as the archive for that task list. Each time you archive tasks in the future, Notebooks will append them to the existing archive, keeping everything neatly organized in one place. - From the task list’s process menu, select Compress to create a zip archive from the book. All tasks, their states and system files will be included in the archive, and you can restore the list to its current state from the archive anytime later.